TABLE OF CONTENTS
- Introduction to Purchase Orders
- Creating a Purchase Order
- Purchase Order Statuses
- Receiving a Purchase Order
- Closing a Purchase Order
- Common Mistakes & Troubleshooting
Introduction to Purchase Orders
Purchase Orders (POs) let you create, manage, and submit orders directly to your suppliers to fulfill your inventory procurement needs. You can create and manage them by navigating to Inventory on the left navigation menu, then selecting the Purchase Orders tab.

Settings to consider
i. Supplier profiles and key settings
To create, edit, and delete Supplier profiles, select the Suppliers tab.

Within a Supplier's profile, you can store the Address, Internal notes, and configure the following optional settings:
- Default Lead Time: The amount of time the Supplier takes to fulfill and deliver the PO.
- Purchase Order Payment Terms: The amount of time before payment is due. Can be added or modified on the PO.
- Minimum Purchase Order Quantity: The minimum product quantity required in a PO. If the minimum is not met, you won't be able to create or save the PO.
- General Order Frequency (Days):How often you place orders with the Supplier, in days. For example:
- 1 month - set to 30 days.
- 1 week - set to 7 days.
- Multiple days per week - determine the average number of days between orders and set it accordingly.
- Minimum Purchase Order Amount ($): The required total cost of items ordered. If the minimum is not met, you won't be able to create or save the PO.
- Contacts: The Supplier's point of contact name, email, and phone number.
- Meta Data: Optional field for mapping to other systems via API/webhook integrations, storing additional information (external system IDs, internal classifications, integration settings), or supporting custom internal reporting.
ii. Parts with assigned suppliers
An inventory part can have one or more suppliers, but only one active supplier at a time.
- Stock Number: The part's stock number as provided by the Supplier.
iii. Supplier Purchase Unit of Measure
The Supplier Purchase Unit of Measure is the unit you purchase the part or fluid in - for example, gallons, ounces, boxes, or cases.
It does not need to match the sale Unit of Measure set on the part. As long as you have the appropriate conversions set up, Droptop will automatically convert the purchase unit of measure into the sale unit of measure. For example:
- Gallons → quarts
- A box of 5 → eaches
This lets you order in whatever unit your supplier sells in, while your inventory continues to track and sell in the unit your shop uses.
iv. Purchase Order settings within Operations Settings
You can set rules for Purchase Orders under Account Settings → Operations → Settings → Purchase Orders tab.
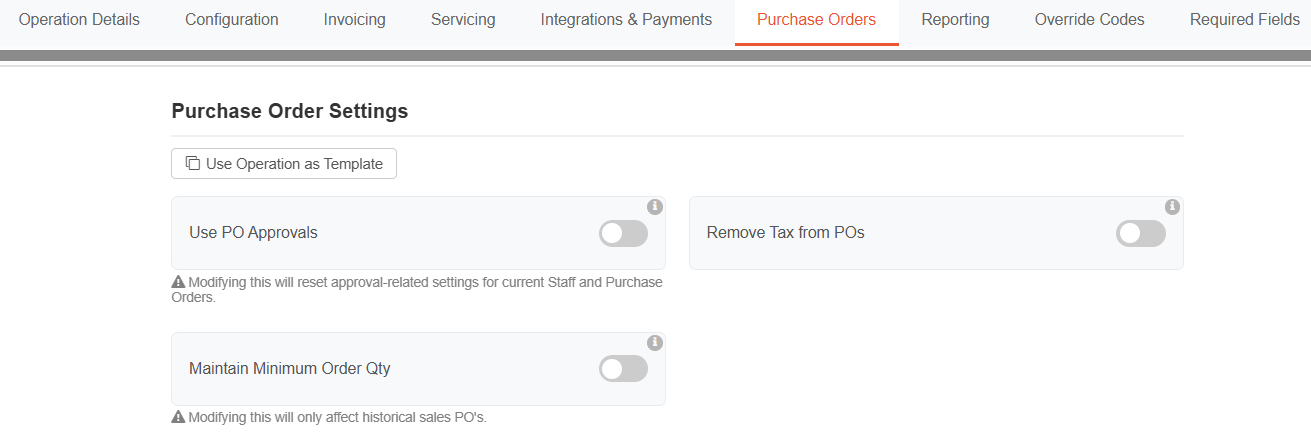
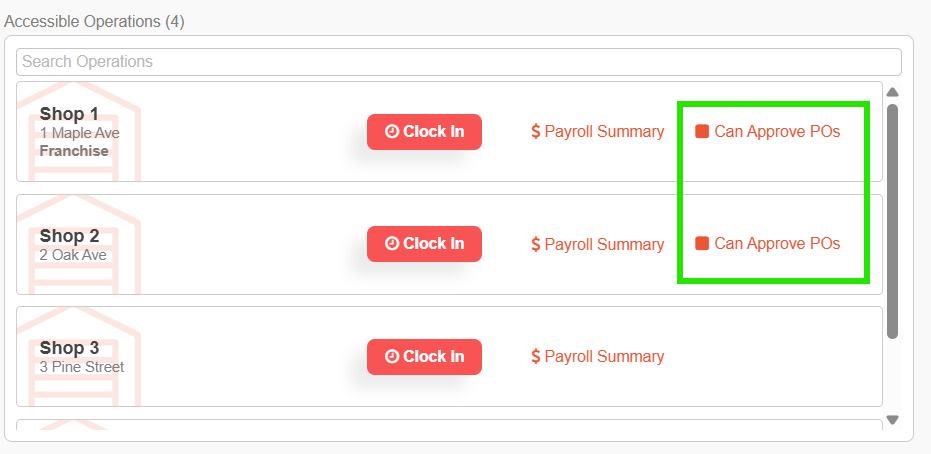
Use PO Approvals: When enabled, pending Draft POs can be approved or rejected by select staff.
Configure this under:
Account Settings → Operations → Staff → Select Staff → Under Accessible Operations → Toggle on Can Approve POs.
Remove Tax from POs: When enabled, tax is removed from all future POs.
Maintain Minimum Order Qty: This setting affects POs generated by Historical Sales.
- When enabled: replenishable parts with 0 Quantity On Hand, 0 On Order, and no sales history will still generate a quantity of 1 on Historical Sales POs. This means parts with no movement ("dead stock") would be added to a new PO unnecessarily - though this can be useful for identifying dead stock during inventory review and deciding whether such parts should be cleaned up or removed.
- When disabled: nothing is added to the Purchase Order for these parts.
Creating a Purchase Order
A PO can be generated in one of three ways:
Type of PO | Description |
| i. Manual | Choose the desired products and quantities from one Supplier. |
| ii. Min/Max | Automatically chooses products from one or more Suppliers based on the Minimum Quantity, Maximum Quantity, and Quantity on Hand settings. If Quantity on Hand is less than or equal to the Minimum Quantity, the system adds enough to bring the quantity up to the Maximum. Key formula: Maximum − Quantity on Hand = PO Quantity Example: if a product's Minimum is 5, Maximum is 10, and Quantity on Hand is 3, the PO Quantity is 7. |
| iii. Historical Sales | Chooses products from one or more Suppliers based on your sales history and a "Days on Hand" metric. Droptop estimates how much of each product you'll need before your next order arrives. Key formula: Average daily usage × Days to cover - On-hand quantity - Quantity already on order = Suggested reorder quantity See Step-by-step instructions below for a full breakdown of how this method works. |
Start a PO by selecting + New Purchase Orders and choosing the desired Generation Method.
As a note, selecting multiple Suppliers generates individual POs.


i. Manual
Choose your own products. A Manual PO orders from one Supplier at a time.

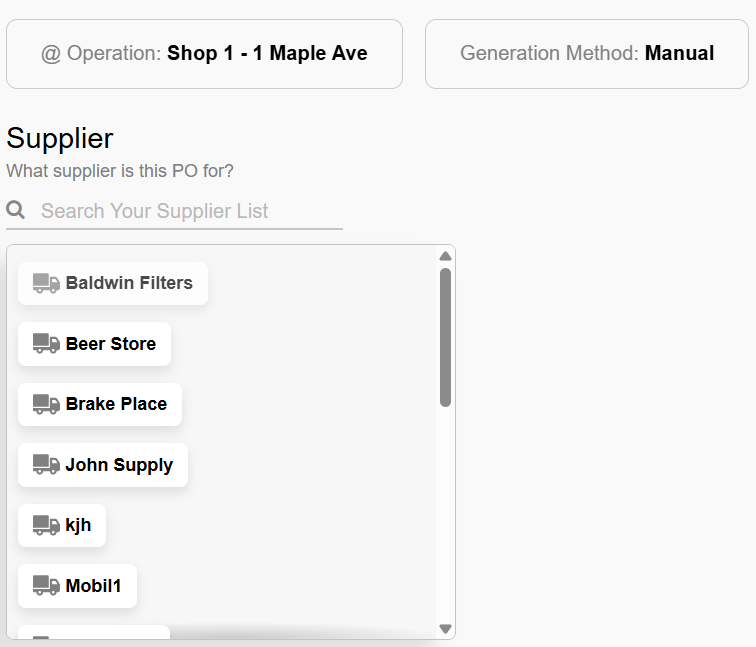
The supplier's profile settings will be reflected within the PO. Select + Inventory Products and a window will pop up to add products to the PO.

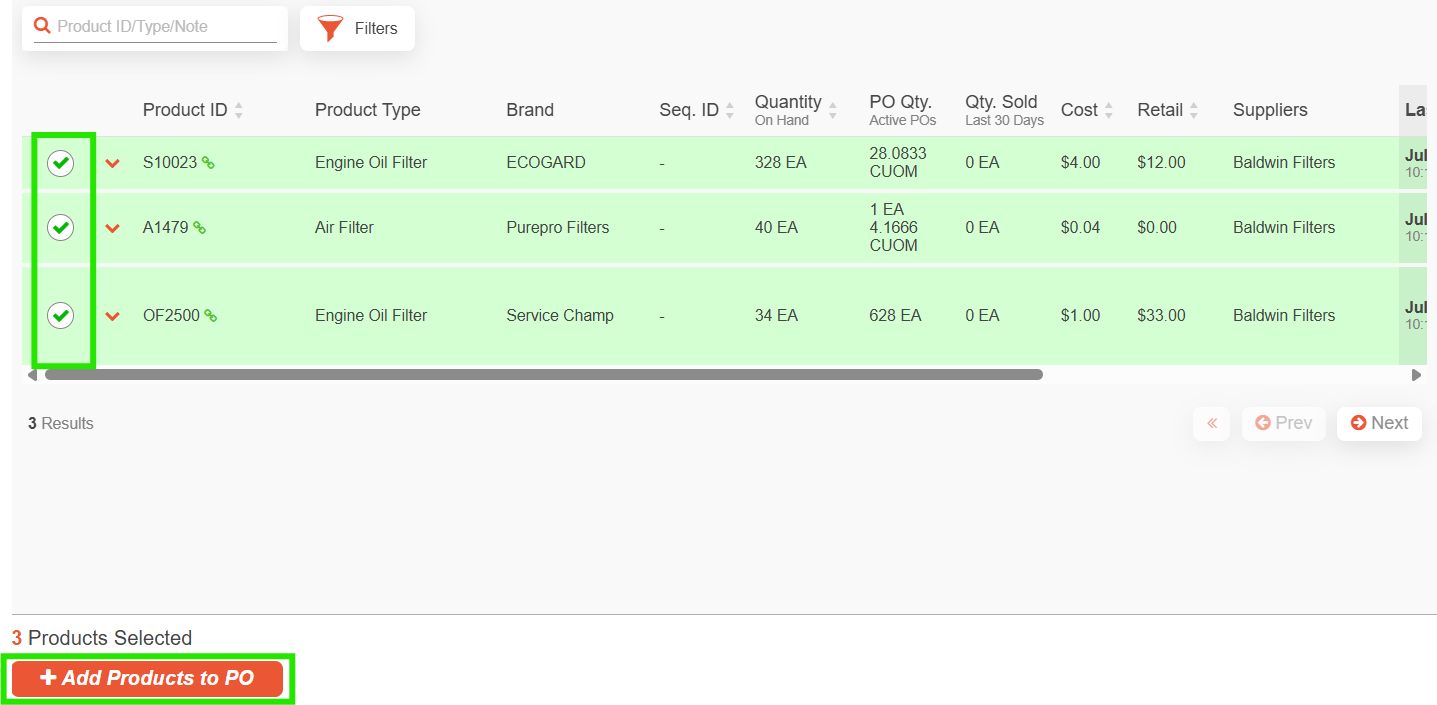
Once added, you can modify PO quantities, Unit of Measure, and Unit Cost for each product. You can add more Inventory Products and/or Casual Items, remove products, and make other changes.
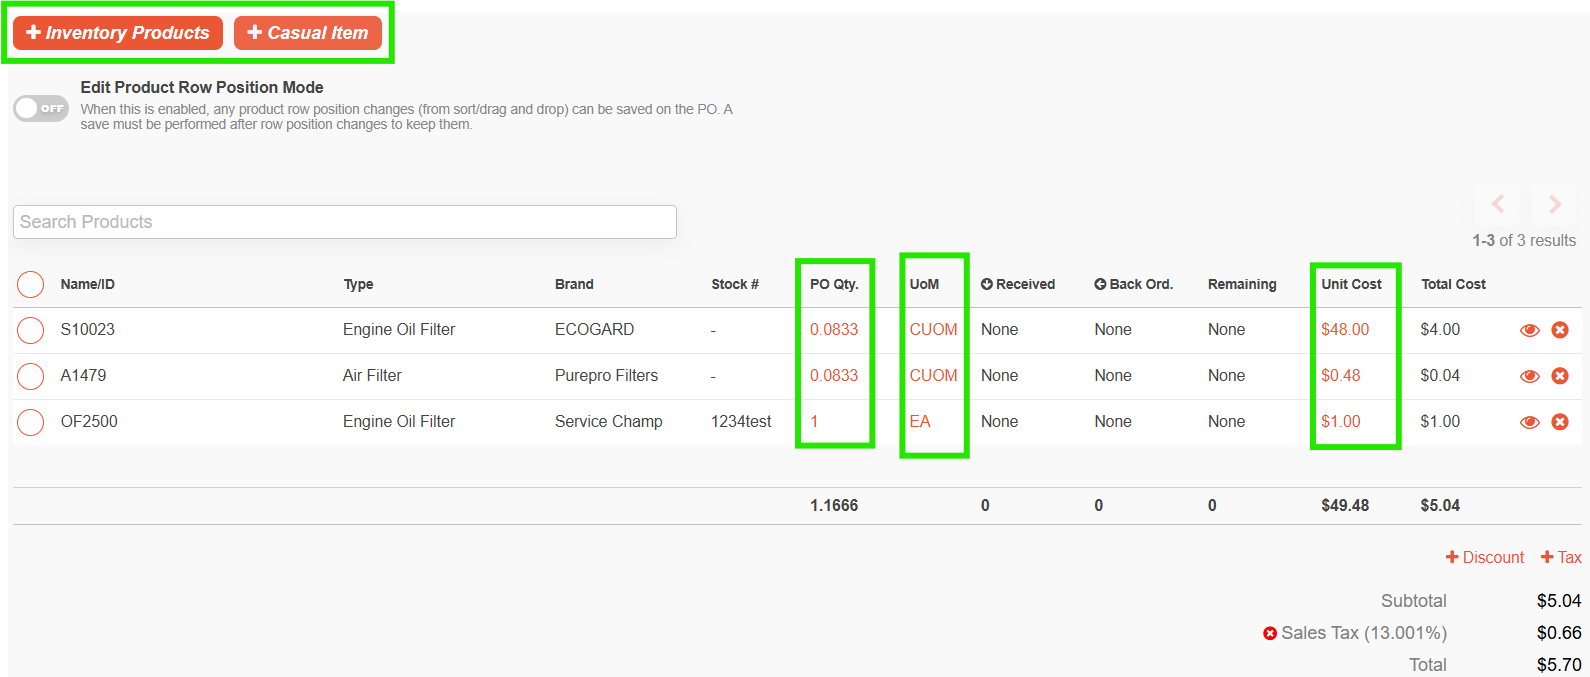
When you're satisfied with your changes, select Generate Draft PO.
If staff approval is required, an assigned staff member will need to change the status to Approved.
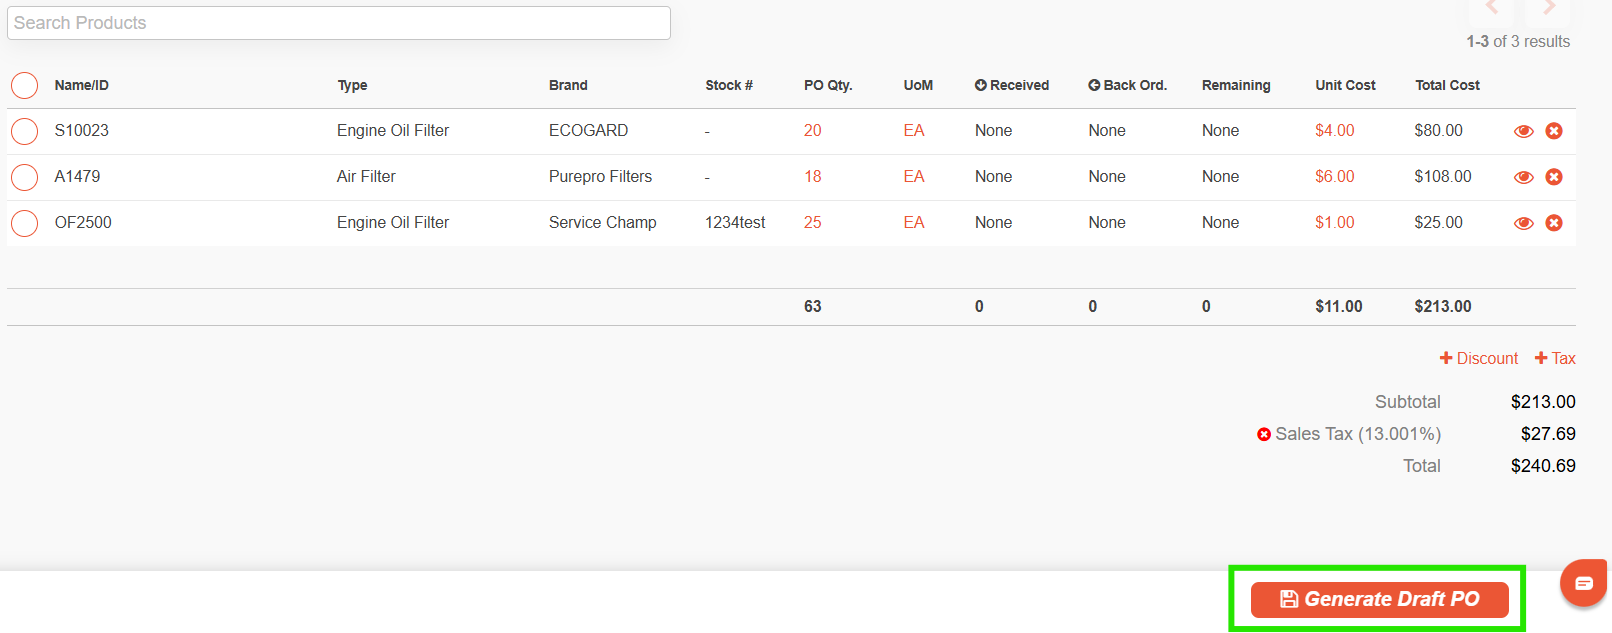
You can change the PO Status and Pay Status as needed.
ii. Min/Max
Automatically chooses products based on the configured min/max settings of the products. In a Min/Max PO, you can select one or more Suppliers.

Product Types that have Minimum and Maximum Quantity settings will be listed, and you can add them to the PO.
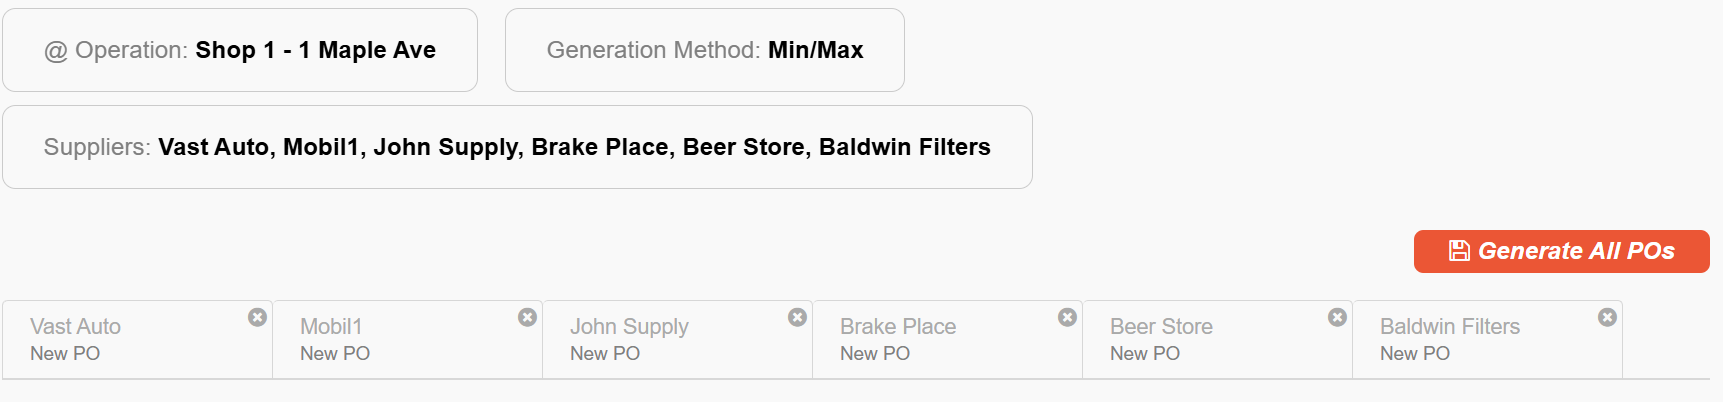
Within the PO, the system lists all products matching the Product Type and suggests a PO Quantity for each, calculated as Maximum Quantity less current Quantity on Hand.
You can remove Suppliers as needed. When ready, select Generate All POs. You can then modify PO quantities, Unit of Measure, and Unit Cost for each product, add more Inventory Products and/or Casual Items, remove products, and make other changes.
iii. Historical Sales
This method chooses products based on your sales history and a "Days on Hand" metric. When you generate a Historical Sales PO, Droptop looks at your sales history to estimate how much inventory you'll need before your next supplier order arrives.
Select one or more Suppliers, choose the product types you're interested in, and set a date range to analyze.

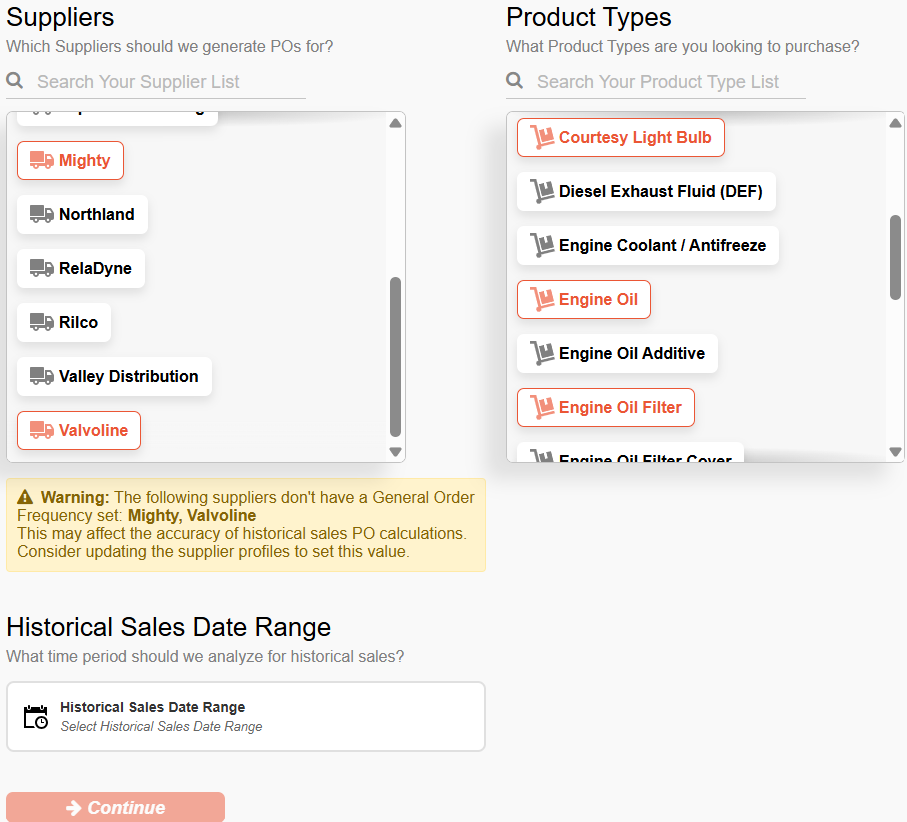
How the suggested quantity is calculated
The system uses this formula:
Average daily usage × Days of inventory to cover - Current stock - Items already on order = Suggested reorder quantity
Droptop determines each value as follows:
- Average daily usage is calculated from the date range you select.
- Days of inventory to cover is driven by two supplier settings working together: the General Order Frequency (how often you place orders) and the Lead Time (how long delivery takes). Together, these define the coverage window - enough stock to last until the next order arrives.
- Current stock is your inventory currently on hand.
- Items already on order are quantities from existing POs that haven't been received yet.
Which products are included
A product is considered only if it meets all of the following:
- It's sold by one of the selected suppliers.
- It's an active product.
- It's marked as Replenishable (something the shop restocks).
- The supplier's listing for the product is active.
- It matches the selected product types.
Why some products don't appear
Even after meeting the criteria above, a product only appears if the system calculates that you need to order more. A product won't be suggested if:
- You already have enough inventory - on hand plus already on an order - to last until your next reorder window.
- It hasn't sold during the selected period and you still have stock on hand (no sales and existing stock means no reason to reorder).
- The supplier has no General Order Frequency configured. Without it, the system assumes a coverage window of zero days and calculates that you need zero of everything — so nothing is suggested for that supplier unless the Minimum Order Quantity setting applies.
Minimum Order Quantity (special case)
If the supplier has Maintain Minimum Order Quantity enabled, products with no sales, no stock on hand, and nothing on order will still receive a suggested quantity of 1. This helps ensure you don't accidentally stop stocking an item entirely.
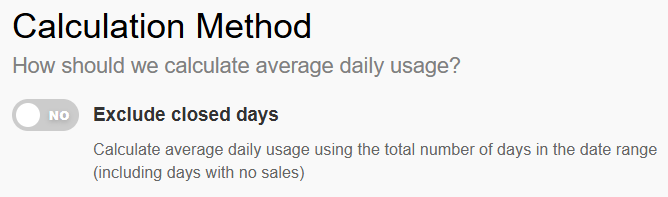
Enclude Closed Days
This setting changes how average daily usage is calculated:
- Enabled: divides total sales by every calendar day in the selected range.
- Disabled: counts only days the shop actually recorded sales, producing a higher average daily usage and therefore larger reorder suggestions.
Linked Products
If a product has linked inventory items (the same product tracked under different entries), their sales are combined and rolled up to the primary item, so the reorder suggestion reflects total demand across all linked variants.
Within the PO, the system lists all matching products and suggests a PO Quantity for each, using the formula above.
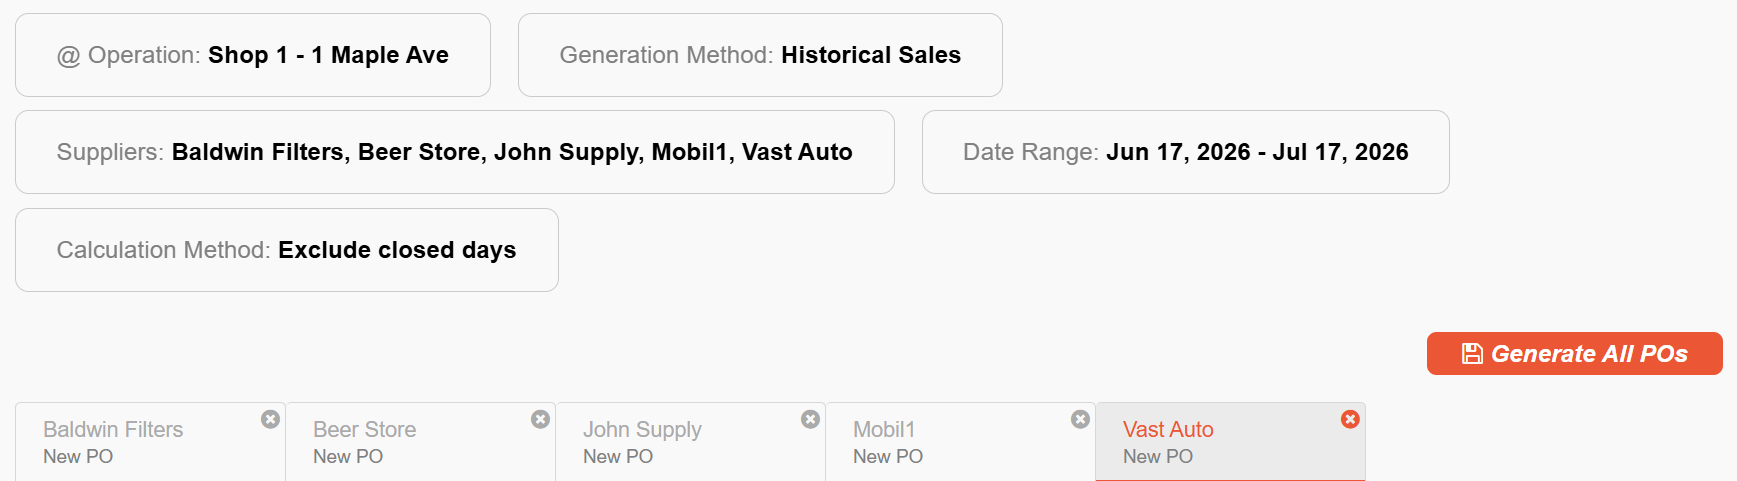
You can remove suppliers as needed.
When ready, select Generate All POs for the different suppliers based on Historical Sales.
If staff approval is required, an assigned staff member will need to change the status to Approved.
Use cases for when each method should be used
- Manual: Gives you full control over which parts and quantities to add, from one supplier at a time.
- Min/Max: Gives you more control over inventory levels. By setting a minimum and maximum for your parts, the PO recommends ordering enough to bring stock back up to the maximum whenever it falls below the minimum. You can order from one or more suppliers.
- Historical Sales: Drives restocking by usage patterns rather than fixed thresholds. It looks at historical sales, operation settings, and supplier settings to recommend what should be ordered - ideal when demand varies and you want reorder quantities to reflect actual movement.
Purchase Order Statuses
There are four types of statuses:
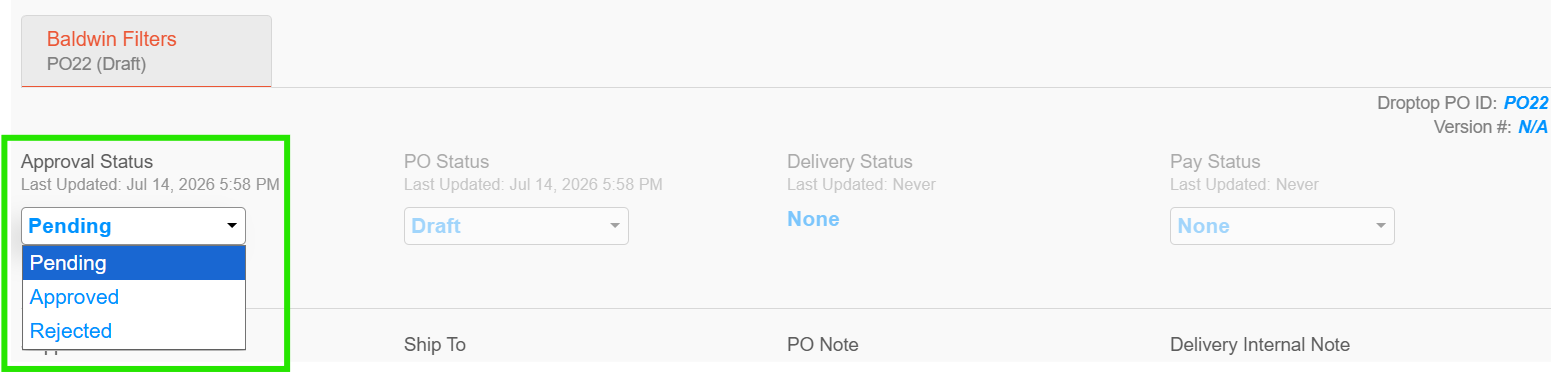
i. Approval Status: Available when the PO Approvals setting is enabled under Operation Settings → Purchase Orders tab.
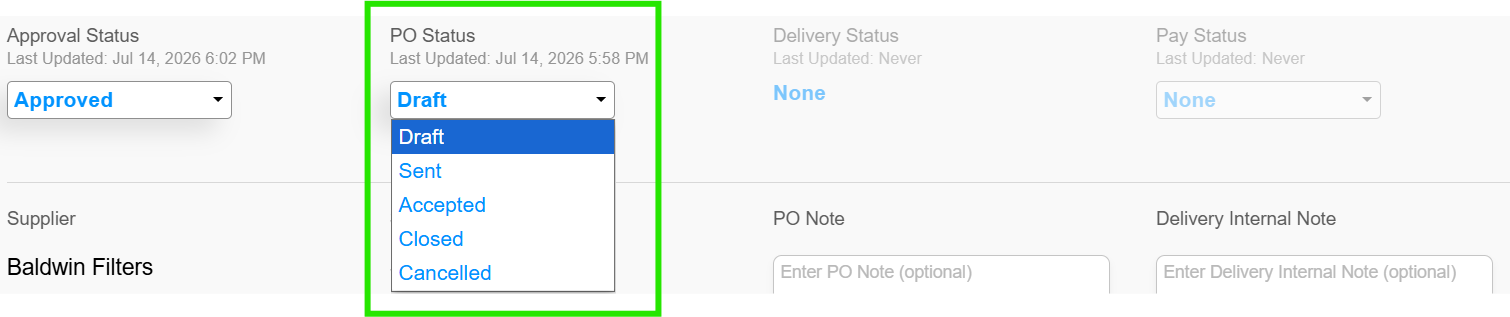
ii. PO Status: Five statuses for creating and completing a PO.
iii. Delivery Status: Four statuses. Updates automatically as PO Qty / Back Order changes.

iv. Pay Status: Five statuses.

When and how each status should be used
Status Type | Status Dropdown |
| i. Approval Status | 1. Pending: PO has been created and sent for staff approval. 2. Approved: PO has been approved by staff. 3. Rejected: PO has been rejected by staff, which also cancels the PO. A new PO may need to be created. |
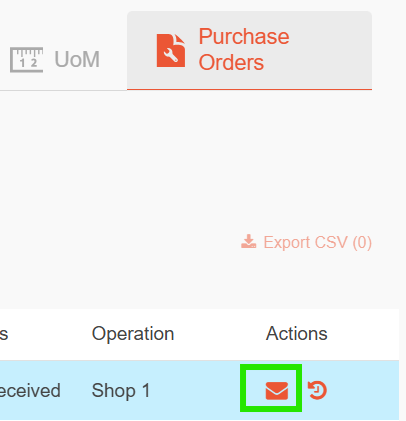
| ii. PO Status | 1. Draft: PO is being created as parts and quantities are added. It has not been sent to the Supplier yet. 2. Sent: Changing the status to "Sent" opens the PO. To send it to the Supplier's point of contact, go to the Purchase Orders manager page and click the email icon in the PO's row to Send Email.
You can also export the PO by selecting the circle in the PO's row and choosing Export CSV at the top right.
Changes to the PO are recorded in the PO History. It cannot revert back to Draft. If the PO Approvals setting is enabled, approval is required before the PO can be sent. 3. Accepted: The Supplier has accepted the PO. You can now receive quantities and/or indicate quantities on back order. You can continue to add parts and casual items, but you'll need to manually notify the Supplier. 4. Closed: PO is complete. If further changes are required (new items, received/back order quantity changes), you can change the status back to Accepted. 5. Cancelled: Use when a PO is no longer needed. No notification is sent to the Supplier, so you'll need to reach out. Once Cancelled, no further changes can be made. |
| iii. Delivery Status | 1. None: Default status until PO quantities or back order quantities are updated. 2. Back Ordered: Some quantities are on back order. There may or may not be some received PO quantities. 3. Partially Received: Some PO quantities have been received and there are 0 back ordered. 4. Fully Received: All PO quantities have been received and there are 0 back ordered. |
| iv. Pay Status | 1. None: Default status until manually updated. 2. Unpaid: No payment has been submitted to the supplier(s). 3. Invoice Received: The supplier's invoice for the PO has been received. 4. Partially Paid: The PO invoice has been partially paid. 5. Fully Paid: The PO invoice has been fully paid. |

Receiving a Purchase Order
Full receiving process
When your order has arrived and you'd like to receive the items into inventory, navigate to the Purchase Orders section and click the corresponding purchase order ID to open the details.

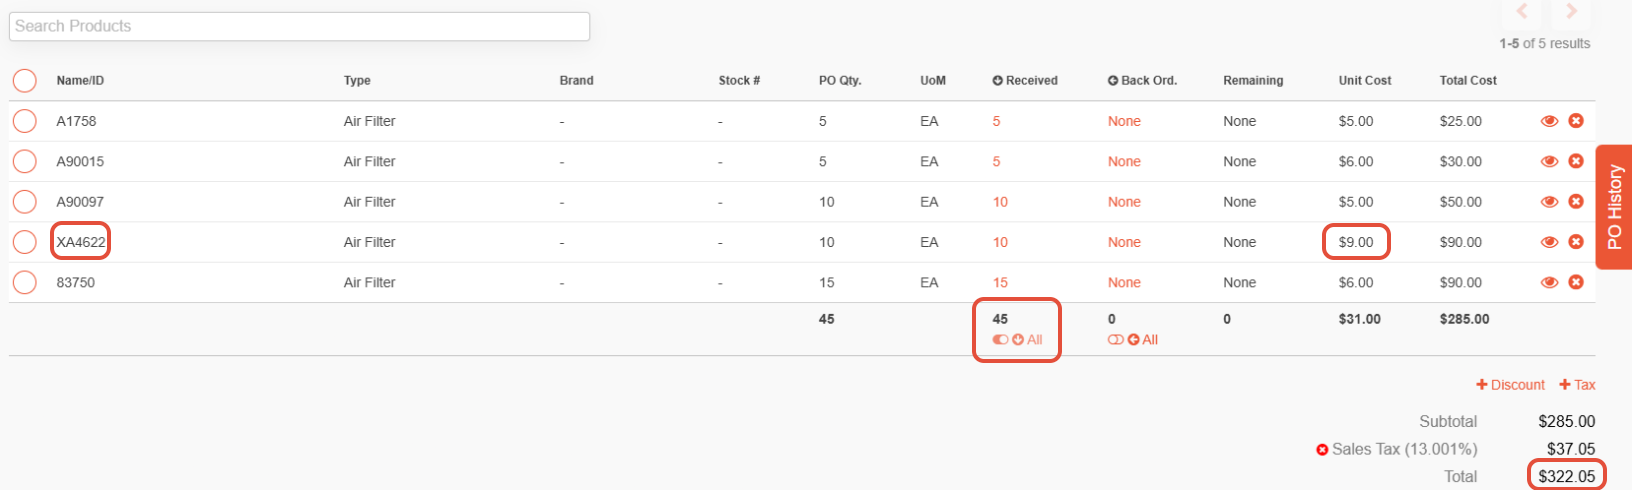
Once it loads, review that the item costs match. If there was an increase or decrease, modify the Unit Cost inside the PO to reflect the change. When the review is finished, set the PO Status to Accepted so you can enter received quantities. Scroll down and click the ALL button at the bottom to receive the full order (only do this if everything delivered matches the PO quantity you sent). Hit Save PO to update your inventory with the quantities in the "Received" column; the Delivery Status will move to Fully Received.
In the example below, one of the filters (XA4622) had a temporary price fluctuation to $9.00 per unit, increasing the total from $288.15 to $322.05.
Partial receiving process
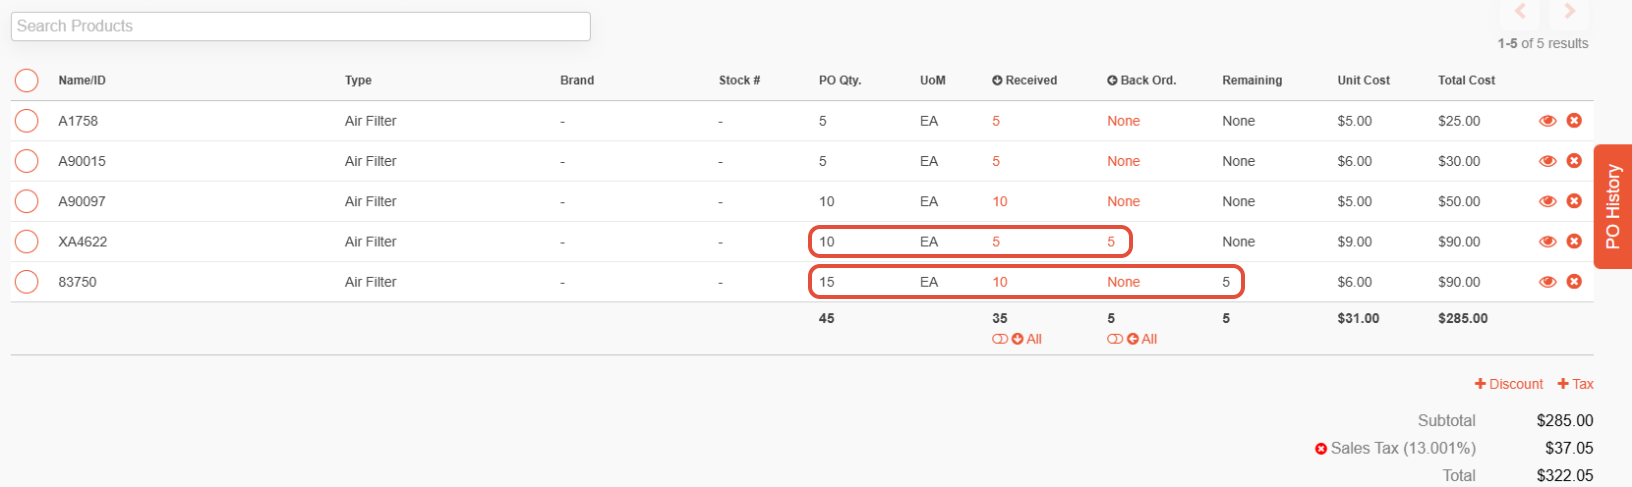
If your order has only partially arrived, specify which items you've received in full and which are still coming. Open the PO, make sure the PO Status is set to Accepted, then scroll down to the Products table. Each product row has three quantity fields:
- Received: The quantity that has arrived and is going into your inventory now.
- Back Order: The quantity confirmed as still coming from the supplier in a later delivery.
- Remaining: Auto-calculated as PO Qty. minus Received minus Back Order — the quantity not yet accounted for.
Fill in the Received and Back Order amounts. Their total cannot exceed the PO Qty., and the Remaining column updates on its own. Hit Save PO to update your inventory with the quantities in the Received column. Once saved, the Delivery Status updates automatically to Back Ordered, Partially Received, or Fully Received depending on the amounts entered.
Impact on inventory
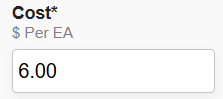
Once you've saved a PO, the quantities are updated in your inventory. The Unit Cost is displayed in the "Change History" when you click on the specific item, on a FIFO (First In, First Out) basis. This allows for temporary price fluctuations without permanently modifying the product's cost in inventory. The relevant PO number is also displayed for tracking. See the example for filter "XA4622" below:
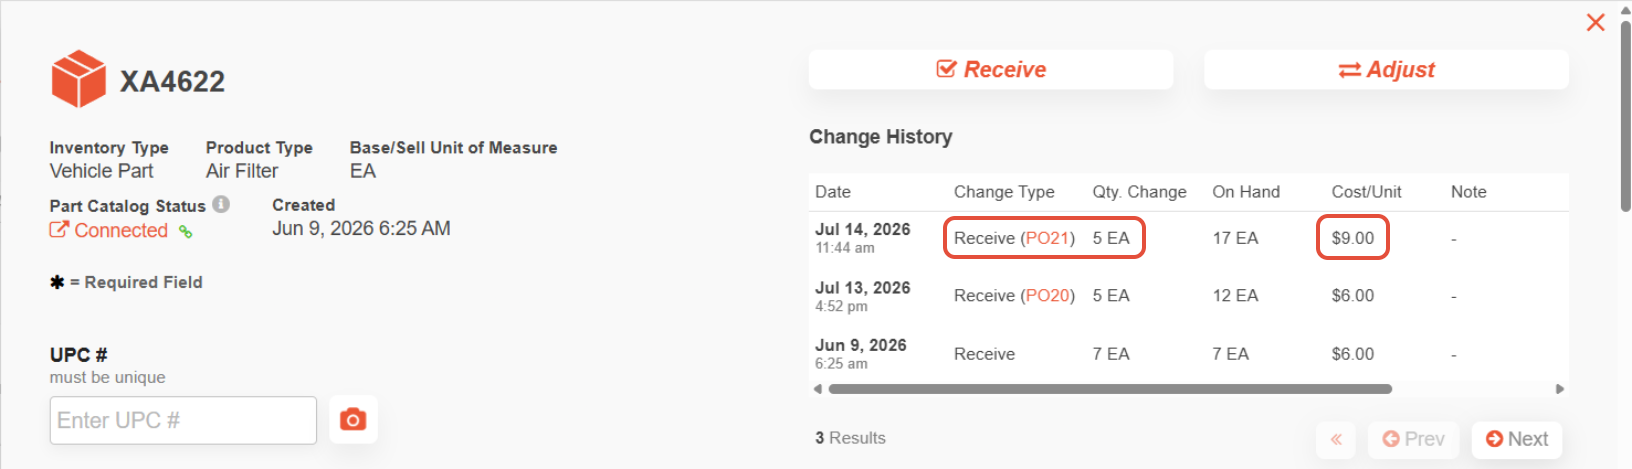
The overall cost remained at $6.00 while still capturing the fluctuation in the change history. In other words, you can receive a batch at a one-off higher or lower cost without overwriting the product's standing cost in your inventory — the exception is recorded against that specific PO for traceability, not applied to the item permanently.
Closing a Purchase Order
When a PO should be closed
The ideal time to close a PO is once all items have been received and the Pay Status is set to Fully Paid. You can, however, close a PO early — before everything has arrived - if you don't expect the remaining items or simply want it off your active list. The tradeoff is that a closed PO with outstanding back orders won't prompt you to receive the rest, so if those items do arrive later, revert the status to Accepted to receive them; the total cost will update accordingly.
How to properly close it
Open the PO and change the PO Status dropdown to Closed. Then update the Pay Status accordingly and hit Save. The Pay Status is primarily used by accounting team members who have access to Droptop.
Common Mistakes & Troubleshooting
Receiving inventory without a PO
When receiving parts, always check the Purchase Orders section first to see whether any POs correspond to that delivery. If the parts were ordered without using the purchase order module, receive them via the inventory method instead:
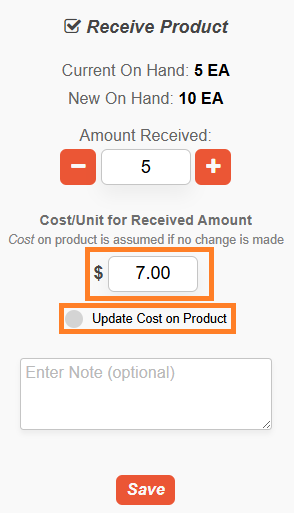
Click Inventory on the left panel to view all items. Use the search bar to find the item, then click its Product ID to open the product details. Use the Receive button at the top right to accept new inventory — this also lets you add notes or record price fluctuations. If the cost is permanently changing, click Update Cost on Product. Hit Save when done; your changes will be recorded in the change history.
Incorrect quantities ordered
If you entered incorrect quantities on the PO, you may reopen and update them with the correct values. However, if you've already sent the invoice to your supplier, you may need to send an amended invoice or reach out to inform them of the changes. Once items arrive, verify the quantities: if they match, update the status to Accepted and proceed; if they don't match, reach out to your supplier to investigate.
Incorrect costs entered
How you fix an incorrect cost depends on whether the items have been received yet.
Scenario 1 - Items not yet received. This is the simple case:
- Revert the PO status back to Sent.
- Correct the Unit Cost of the affected item(s).
- Change the status back to Accepted and receive the parts as usual.
- Add an internal note on the PO indicating that you corrected the cost.
Scenario 2 - Items already received at the wrong cost. Because inventory was already updated, you fix the cost on the received items in the Inventory module rather than on the PO:
- Go to Inventory, search for the item, click its Product ID, and open the product details.
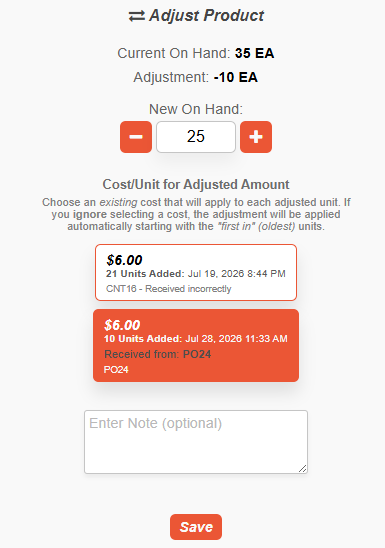
- Click ADJUST at the top right, reduce the On Hand quantity by the amount received at the wrong cost, and apply that adjustment to the corresponding PO (this targets the most recent receipt rather than the oldest).
- Click RECEIVE and re-enter that same quantity at the correct cost.
- Add a note to the PO stating the cost was incorrect and was fixed on the item itself.
Example: 10 pieces were received on PO24 at $6.00, but the actual cost was $9.00. Reduce On Hand by 10 (applied to the PO24 addition), then receive 10 again at $9.00.
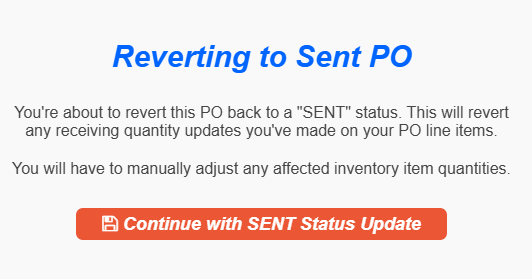
Note: The steps above correct the cost in your inventory, but they do not change the cost shown on the PO itself - the PO note is only for traceability. If you need the PO totals to match as well, you'll have to adjust and revert all items received via that PO (whether or not each one was correct), then revert the PO to Sent, make your corrections, and receive everything again. The system will warn you that reverting to Sent resets the received quantities; click Continue to proceed, then set the status back to Accepted to receive with a clean slate.
Reverting a PO to Sent (and why received quantities reset)
While a PO is in the Accepted status, the module won't let you receive more than you ordered. But reverting a PO back to Sent wipes the received quantities and starts the PO from a clean slate - in the Sent status, it keeps no record of what was previously received.
This is the single most common source of double-counted inventory: if you revert to Sent, receive again, but never adjusted/reverted the quantities you already took in, those items end up counted twice. Always adjust/revert previously received quantities in the Inventory module before reverting a PO to Sent.
Quick reference
Issue | How to fix it |
| Parts arrived that weren't ordered through a PO | Receive them via the Inventory module (Inventory > Product ID > Receive). |
| Wrong quantities on the PO | Reopen the PO and update the quantities; send an amended invoice to the supplier if one already went out. |
| Wrong cost, nothing received yet | Revert to Sent, correct the Unit Cost, set back to Accepted, and receive. |
| Wrong cost, items already received | Adjust the item in Inventory (reduce On Hand, apply to the PO), then re-receive at the correct cost. |
| Need to revert a received PO to Sent | Adjust/revert all previously received quantities in Inventory first, or the items will be counted twice. |
Note: Once a PO is Cancelled, it cannot be reopened.
Have any questions? Don't hesitate to reach out via live chat or email us at support@droptop.io - we're happy to help.
Was this article helpful?
That’s Great!
Thank you for your feedback
Sorry! We couldn't be helpful
Thank you for your feedback
Feedback sent
We appreciate your effort and will try to fix the article